You are the lucky owner of a piece of land. Congratulations! But don’t rush to plant your favorite fruit crops, berries or build fences. The plot should unfold as popularly known. Take your time to catch up.
After buying land, you will need to do a lot of work on the paperwork for the property before you can get hold of the plot. After all, the sales contract is only the initial stage of ownership.
THE BEGINNING OF PROPERTY DEVELOPMENT
It all starts with the registration of the property. The land purchased must be “secured,” meaning that it must be documented. This is to ensure that a small number of inches in one direction does not become a big problem for you or your heirs in the future. So don’t rush into a plot of land to dig, plant, or build.
- First, with the documentary proof of the purchase of the plot, you must apply for registration with the local cadastral office. Obtain the cadastral number of the purchased property.
- Don’t skimp! You have the right to investigate the size of your plot, even if it was purchased from a previous owner, has good neighbors, and does not claim an illegal occupation of a 4-8inch (10-20 cm) area. It is necessary to conduct a land survey. This procedure will legally determine the boundaries and area of the parcel on the ground.
- When you obtain these two documents, you must demarcate the land yourself. That is, you must mark the boundaries on the ground. To do this, you must properly fence the area. On the inside of the plot, stake out the posts (do not go over the boundary line) and temporarily pull in wire or barbed wire.
- Examine the plot inside the fence and calculate the material possibilities for its development and arrangement. Consult with the family on how to proceed: while building houses and other family buildings, problems related to vegetables and gardening are solved entirely by yourself, only in extreme cases taking external help or seeking help from builders, gardeners, agricultural workers.
PRE-PLANNING OF THE SITE
While the paperwork is being processed, start planning the site. Take your time! Familiarize yourself in advance with the requirements for observing the boundaries of buildings and plantings with adjacent plots. In construction zones, residential plantings will be placed 13-16 feet (4-5 meters) away from neighbors, or so that the shadows of houses and other structures remain on their own plots for as long as possible. Trees on the perimeter of the plot should be planted at a distance of 10 feet (3 m), and berry trees should be placed 6.5 feet (2 m) from neighbors’ plots. Strawberries and garden plants are 12-20inch (30-50 cm) away from the dividing fence when erecting a green fence. Select varieties whose underground shoots do not form numerous shoots to avoid bringing litter to the neighbor’s plot.
MANDATORY AREAS
If you are new to gardening, seek out a professional and take his advice. If you are planning on your own, outline the mandatory zones on a global plan and follow the boundary guidelines.
- Utility areas.
- Recreational areas.
- Gardening.
- Gardening and vegetable gardens.
The same plan should also indicate public access, water, and sewer connections. The main central entrance should be wide enough (to the garage, house) but not deep inside the plot, as you will not be able to use the land for other purposes.
Plan the location of the zones on separate sheets of the building plans (to a certain scale), taking into account the occupied area. In the economic zone, you mark the location of buildings (house or garden shed, garage, additional outbuildings (temporary sheds), workshop, sanitary zone including toilets, sauna, and others). You start with the sanitary area. It should be placed at least 50-65 feet (15-20 meters) from the house (in the absence of permanent sewerage) to prevent waste from toilets and bathrooms from entering neighboring homes (especially garden plots).
DESIGN OF THE COMMON AREA
Create a water connection or artesian well and a sewerage system with toilets. You also have to prepare the living conditions. You are also setting up a tent or caravan to store construction materials, tools, and other utilities temporarily. Then, with a construction plan in place, you start bringing in building materials, digging foundations, etc.
DESIGN OF THE GARDENING AREA
On the next sheet of the plan, mark out the vegetable garden and gardening areas. The garden, berry garden, and vegetable garden can be located in a combined area at the front, side, or back of the building, but be sure to place plants from north to south for better light. If all 3 types of crops are arranged one behind the other, place a vegetable garden in the first area whose low plants will not shade the crops in the second area (berry trees), which in turn will not cause problems for lighting the fruit crops. If the garden, berry patch, and vegetable garden are located in different parts of the plot, their layout must comply with the following conditions.
- The orchard and berry patch must be located in an open, sunny area with a high water table. They cannot be laid out in low-lying areas. Cold draughts and excess water during spring floods can affect crops.
A garden plot should include a rotation of 5-11 crops so that no crop can return to its original location until 3-5 years have passed. The plot should receive enough sunlight and be protected from the wind. - In order to successfully develop the horticultural area, it is necessary to carefully consider which crops to place on the allocated plots and to place them on a scheme, indicating the species and the distance between them. When placing crops on the plan, note that the distance between fruit crops should be at least 10-13 feet (3-4 m) (10 feet (3 m) for dwarf or colonial species and 5-6.5 foot (1.5-2 m) between shrubs). In the garden journal, please write down the names and short descriptions of fruit and berry crops, and in the plan, indicate their location in the plot area with numbers.
PREPARE THE SOIL FOR THE GARDENING AREA

Once you have established your irrigation and drainage system, the main cables are in place, and the building plans are complete, the general layout of the garden area can be laid out in situ. Transport the topsoil from the building site to the “soil island,” i.e., to the future planting area marked on the base map.
Perform horizontal grading and level the soil brought into the field. If the area is virgin, it should be plowed or dug up, and soil samples were taken to the nearest laboratory for chemical and physical analysis. With the results of the analysis, you can begin to improve the area.
- If the soil is acidic, deoxygenate it.
- Weed infestation can be reduced in different ways: with or without chemical herbicides. In the first year, provocative irrigation, cultivation, which leads to an increase in weed reproduction, reduce the total infestation of weeds (mainly annual weeds) by burying them.
- If the soil is poor, increase the general fertility background by applying manure, poultry manure, humus, mineral fertilizers, sowing glycosides, etc. These works are essential. Do not plant vegetables in a hurry. Sowing and planting should be done in prepared soil. Otherwise (especially with infrequent visits), you will harvest a large pile of fertilized weeds.
DESIGN OF THE SITE FENCE
Construction and horticultural works are in progress in the allocated area. Drainage, water, and sewer connections have been completed. Once the large building materials (slabs of stone, etc.) have been brought in and placed, you can start building the fence. It is best to end up building the front of the fence at the entrance to the yard.
You can build a solid fence around the plot’s perimeter with stones and other building materials and cover it with ornamental shrubs. You can plant a perimeter hedge with ornamental deciduous and ornamental flowering tall shrubs (beech, weeping, buckthorn, and other crops). The thorny, intertwined shoots not only decorate the plot but also protect it from unwanted visitors. The entrance area of the plot is one of the last places to be decorated. It consists of a gate and a concrete area decorated on both sides with small architectural forms, lights, decorative squares, and arches.
DESIGN OF THE PLAY AREA
The last area to be laid out is the relaxation area. Its size, decoration, list of structures depends on the intended use of the land.
- A place for family recreation, where the maximum allocation of green landscape with decorative plants, flower beds, alpine slides, mixed borders, sports, and other facilities: sandpits, dollhouses, swings, gazebos, gymnastic walls, swimming pools, ponds with fish and aquatic plants.
- A permanent family home with all amenities, a greenhouse, a conservatory or conservatory, a guesthouse
- An ordinary large estate with a bungalow, a garage, and some other architectural forms of family areas. In such a large estate, the main area is allocated to the gardening area, aimed at growing organic and anti-allergic products for fresh and winter preparation. In this case, the recreational areas are limited to areas for cooking exotic dishes (barbecues, grills) in the open air, a pergola, and a flower garden.
After arranging all planned areas, regardless of the purpose of the plot, it is necessary to equip it with working aisles, placing narrow strips of flowers or shrubs on both sides of the aisle, which will not lose their decorative effect after cutting. Decorate different corners of the entire plot with ornamental plants.
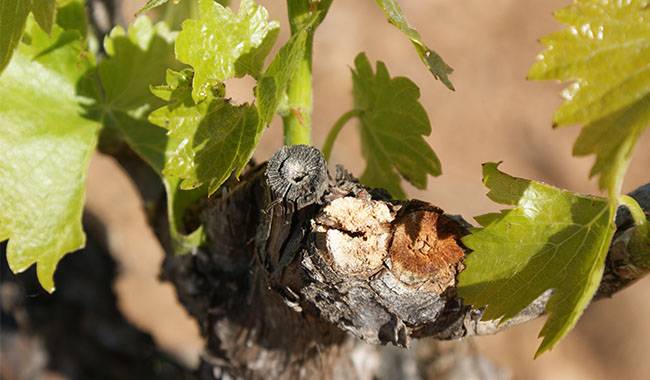
When a previously developed plot was purchased, the same zones were laid out on architectural blueprints or building plans, and a thorough inventory of buildings and live plants was made in situ. Each zone is accompanied by a list of works, which includes the reconstruction of the home site. Old, diseased fruit trees were to be cut down.
To make the stumps decay faster, several holes are drilled in the stumps, filled with ammonium nitrate, and covered with a permeable material. The ammonia fertilizer will eat away at the wood in a short time, and the stump will no longer be difficult to remove from the ground. If the stump is left on the lawn by a recreation area or pond, you can cut out the middle area (creating a bowl), fill it with soil, and plant flowering plants. Inconveniently located berry bushes can be replanted in a new location instead of being cut down. When a parcel is developed, ornamental shrubs, trees, and group plantings that give the landowner a unique identity are the last to be planted.
More Related Information About Gardening Tips