Almost every large garden plot has a greenhouse. This can be a secluded plot of land in a greenhouse for growing seedlings or a greenhouse for growing the entire crop. Unlike open plots, greenhouses are used more intensively, and over time they can reduce the yield and quality of the vegetables grown. This is caused by the accumulation of various plant diseases, pathogens, pests, and weeds in an enclosed space. To extend the life of the greenhouse and maintain the ability to form a high-quality vegetable crop yield, it is necessary to prepare the greenhouse each year for the next season. It is best to prepare after the fall harvest but before the onset of cold weather.
All work can be divided into 3 stages.
- Cleaning the external area, treating the exterior of the greenhouse and the frame.
- Interior work to prepare the greenhouse interior and the greenhouse frame for winterization.
- Preparing and purifying the soil inside the greenhouse.
PREPARING THE GREENHOUSE AREA FOR THE NEXT SEASON
Fall work can begin at any stage, but it is best to prepare the outside area immediately, especially in areas where the rainy season comes early. Remove weeds, broken crates, and other household items that are scattered around the greenhouse. Stack crates for repairs. This can be done in the winter evenings. Repair, disinfect, dry, and store indoors all greenhouse tools (shovels, rakes, knives, trimmers, saws, etc.).
If there are bears, gadflies, and moles in the open garden, dig around the greenhouse about 40 inches (1 meter) deep for any obstacles (slate, resin-treated plywood, and other unnecessary materials).
During the summer, dust accumulates on the outside of the greenhouse, and fallen leaves and other debris get stuck in the crevices, becoming a place for various diseases and pests to overwinter. Thoroughly clean the greenhouse surface of debris. Then wash the outside with detergent and treat it with a disinfectant solution using 300-400 grams of bleach or 100 grams of copper sulfate per 2.5 Gal (10 liters) of water. Don’t forget personal protection!
If the greenhouse is covered with removable film, dry it, remove it carefully, roll it up and store it in a dry room. If necessary, inspect and repair the frame and treat all its sides with a disinfectant. If the greenhouse is made of polycarbonate or glass, treat the exterior of the lid and frame. If the area is snowy in winter, to protect the structure from deformation under the weight of snow blocks, place T-brackets inside or constantly clean the greenhouse surface of drifts.
INTERIOR WORK IN THE GREENHOUSE
Clean all auxiliary props, shelves, boxes, barrels, hoses, twine, etc. Inspect them, sterilize them, dry them, and put them in an enclosed space.
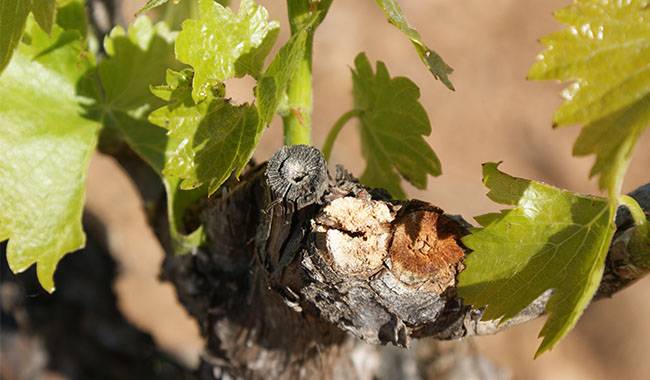
Remove traction from planted crops. Put the healthy ones in the compost pile and burn the sick ones mercilessly or bury them away from the plot.
If the greenhouse is glass or polycarbonate, inspect and replace the broken and shattered glass and broken intact polycarbonate. Seal all gaps in the frame and open beams with sealant.
Wash the greenhouse’s interior with soapy water, dry it and treat it with the same disinfectant solution as the exterior. You can also use a more modern disinfectant available from specialty retailers.
After the greenhouse is dry, treat the wooden frame with copper sulfate and coat the metal frame with copper sulfate (if necessary).
Proceed with disinfecting the greenhouse. Don’t forget to seal it. For disinfection, you can use the good old-fashioned method of fumigating the room with block sulfur. Sprinkle 100-150 grams of sulfur on an iron pan and mix it with a small amount of paraffin (not gasoline) for better ignition. Sulfur balls have a density of about one per 11-16 square feet of greenhouse. Put on protective clothing, respirator, and goggles. Burn sulfur from the far end of the greenhouse toward the exit. Cover the room for 4-5 days. After the procedure, ventilate thoroughly.
Fumigation can be performed with ready-made clay pots. A description of the application can be found on the package.
If the greenhouse frame is made of unpainted metal, sulfur should not be used due to corrosion. In this case, solutions based on bleach, caustic lime, or other chemicals can be used.
Preparation of bleach solution
Dissolve 1.1-2.2 Lb (0.5-1 kg) of dry lime in 2.5 Gal (10 L) of water, let it stand for 3-4 hours, filter it thoroughly and spray the whole greenhouse area. Seal and let it soak for 2-3 days, then allow it to dry.
Prepare a solution of quicklime
Mix 6.6-8.8 Lb (3-4 kg) of slaked lime with 1.1 Lb (0.5 kg) of copper sulfate, mix well with 2.5 Gal (10 L) of water and dilute. Leave the lime for 1-2 hours to thoroughly bleach the wooden frame of the greenhouse, brick (wood) foundation, and other areas of the room that are accessible to pests and suitable for pathogenic microflora.
Prepare biological preparation solution
The use of chemicals in the home environment should be avoided. It is preferable to use biological preparations rather than chemical preparations to treat the interior of the greenhouse. They are based on naturally occurring positive microbiota and are harmless to humans, but can inhibit the development of disease-causing microbiota (especially fungal diseases) for several years. Natural microbial fertilizers are recommended for greenhouse treatment. Dissolve 100 g of this product in 2.5 Gal (10 l) of dechlorinated water and treat the entire greenhouse interior. the treatment should be repeated after 10-12 days.

SOIL PREPARATION AND DISINFECTION IN A GREENHOUSE
In an enclosed space, the soil quickly gets out of order: fertility decreases, acidity becomes evident, pests and pathogenic microflora accumulate. To prevent this from happening, the soil in greenhouses is systematically reconditioned. There are general, thermal, chemical, and biological remediation methods.
General greenhouse soil healthification measures
General measures include complete or partial replacement of the upper 8-10 inch (20-25 cm) layer of soil every year. This method is best suited for small greenhouses. In larger areas, changing the soil, even partially, can be very difficult and is not always worth the effort.
The first option
The used soil layer – usually, 4-6 inches (10-15 cm) is carefully removed from the greenhouse and transported to a prepared area where we spread it into a layered cake: a layer of substrate 4-5 inches (10-13 cm), topped by a layer of manure, compost, dry, healthy traction, fallen leaves, remnants of greenhouse crops or unseeded weed vegetation. This layer should be treated with EM preparations. Biological preparations “Trichodermin” can be used. They will help to treat the plant material faster. Another layer of soil is placed on top. This layer is systematically shoveled over the course of a year, gradually reducing its height. By mixing the humus layer with the soil at the time of excavation, it can be used as outdoor soil for vegetable crops within 1-2 years or returned to the greenhouse more healthily.
Second option
Bring forest or field soil into the greenhouse from a place where no horticultural crops have been grown.
Third option
Partial soil replacement should be done every 3-4 years. In this case, root debris, weeds, and other debris are removed manually from the topsoil after harvesting. You can literally (if the greenhouse is small) sift out the top layer of soil. Also, you can get rid of some pests.
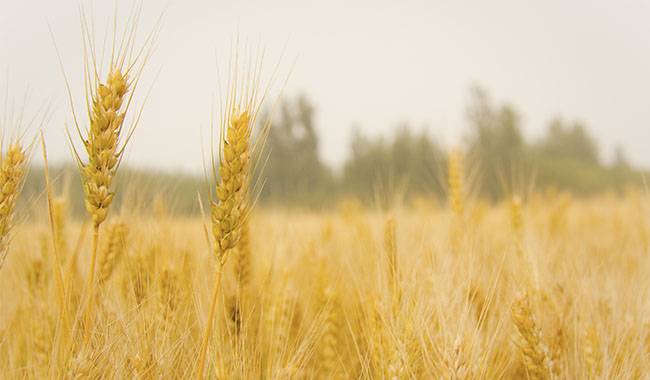
Prepared greenhouse beds can be sown with wintergreen manures (rye, oats, and other crops). They will have time to develop their root systems and form above-ground clumps. At the beginning of the spring greenhouse season, mow the green manure and incorporate it into the upper 4 inches (10 cm) soil layer. 2-3 weeks later, start seeding and planting. The sediment not only enriches the soil with organic matter but also partially disinfects the soil from pests and pathogenic microbiota.
Heat treatment of greenhouse soil
After harvesting and treating the frame and mulch in a film greenhouse, remove the film and seal the treated room for 1-2 weeks in a polycarbonate and glass greenhouse. Let the sun “work.” Sun-dried soil will kill pathogenic microflora, which requires moderate temperatures and humidity.
Remember! This method of disinfection will not only kill pathogens in the soil but also the beneficial microflora.
If it is early and cold in the fall, then steam the soil in the greenhouse with hot (not boiling) water around October/early November, depending on the region. This treatment also kills sufficient numbers of pests and disease-causing fungi, bacteria, and viruses.
Chemical soil disinfection in greenhouses
When brushing white with lime milk and copper sulfate, the solution is applied to the soil to partially disinfect it. After this disinfection, the soil is turned over.
If the topsoil is replaced with new soil after the treatment or has been replaced in the past year, you can treat the soil with copper sulfate solution-25-30 g/2.5 Gal (10 liters) of water and after some time, do some digging on the spade’s bayonet.
Copper sulfate treatment should not be done every year because its accumulation in the soil can inhibit plants.
You can use readily available chemicals from the list of approved chemicals and follow the instructions for soil disinfection.
Remember! Do not use chemicals, especially in protected areas, to obtain ecological products.
Biological methods of greenhouse soil decontamination
The biological method is the most practical way to purify greenhouse soils. It allows you to keep the topsoil untouched for a long time without reducing the fertility or increasing the pathogen load. This is due to the fact that all biological agents help to enrich the soil with beneficial microflora, destroy disease-causing bacteria, fungi, viruses, and at the same time, increase the amount of organic matter and nutrients in the form of available mineral salts in the soil by treating the organic residues of plants.
With biological purification, the soil can be turned over in the fall, treated with a biological solution, and then sown with green manure.
If there is no time, with the beginning of the spring project, we will reactivate the soil, wake up the useful microflora from their winter sleep and raise the soil temperature to 53-57 °F (12-14°С) by watering the soil with moderately hot water. Water the thawed soil with Bay EM solution and rake it into the ground.
Use a drying preparation for this step. Spread it on the soil and water it with warm water. In moist and warm environments, microorganisms start to intensively multiply and destroy disease-causing microflora.
Throughout the growing season, biopesticides can be used against pests and biocides against fungal diseases.
The most effective biocides are BITOXYBACILLIN and LEPIDOCIDE., among the bio fungicides. Trichodermin is both very effective. Consumption rates and treatment times can be found on the package or in the accompanying recommendations for use.
In order to reduce the number of treatments, it is advisable to use a mixing tank and to check the compatibility of the formulations beforehand. It should be noted that by treating plants and soil during the growing season, biological agents protect plants from diseases and pests while they also improve soil health without causing any harm to humans.
More Related Information About Plant Disease