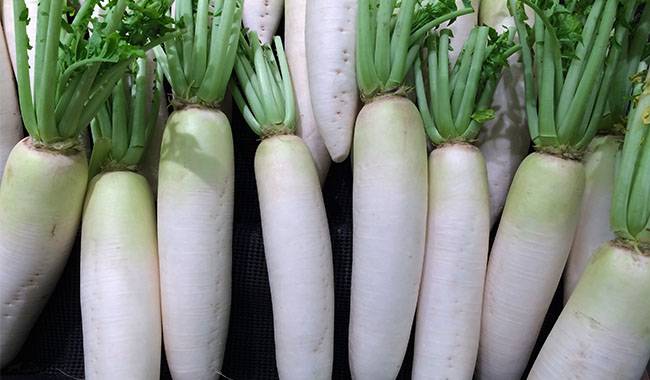
Turnip (white turnip) is an annual or biennial vegetable crop belonging entirely to the genus cabbage in the cruciferous family, also known as cabbage. It is widely believed that the origin of Turnip is Asia Minor, with many sources pointing to a date of introduction into the culture of more than four thousand years ago.
Turnip is a very valuable vegetable as far as nutrition and vitamins are concerned. Growing it is not difficult, but there are some peculiarities in the process. About the method of growing Turnip in the vegetable garden we will tell in this article.
A LITTLE HISTORY OF TURNIP
It is interesting to note that in ancient Egypt and ancient Greece, Turnip was almost the only food available to the poorest segments of society and slaves. But Turnip was not considered a poor food in the Roman Empire, where it was eaten with great pleasure by everyone from the poor to the rich families.
In the United States, Turnip also helped the local population by saving them from hunger. At its roots, it seems you can make anything, but the most basic dish is the usual steamed Turnip, hence the well-known saying. After Peter I came to power, Turnip was actively, and sometimes forcibly, replaced with potatoes, and its cultivation became common.
Local chroniclers note that people who ate Turnip were sick less often and lived longer than those who ate potatoes. Turnip was used by farmers for a long time until the 18th century when they finally succumbed to their starchy guests from the United States.
WHAT KIND OF VEGETABLE IS TURNIP?
In fact, it is a most valuable vegetable and a valuable medicinal plant. turnip can be used for any kind of food, roasted in the oven, boiled, steamed, stuffed, and added to various salads.
Turnip root is an excellent preservative, it is a medicine that stops various inflammatory processes in the body and Turnip even has analgesic and wound healing properties. Eating even a small piece of Turnip before a meal is worthwhile, as you will immediately feel an increase in appetite, and eating it at breakfast, lunch or dinner allows for rapid digestion and better absorption by the body.
BIOLOGICAL DESCRIPTION OF THE CROP
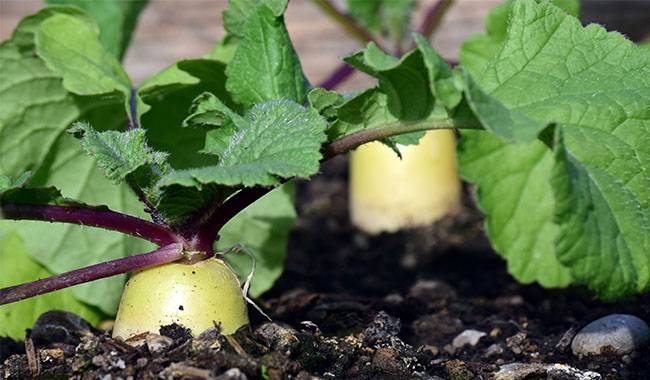
Turnip is a thickened, fleshy root crop that forms underground, with very tall, strongly foliated stems above its surface. Usually the first year after sowing or planting Turnip seedlings on the plot, a root crop is formed, as well as a rosette of leaf discs; in the second season, the root crop produces an arrow with flowers on it, which eventually produces viable, germinating seeds that can be sown again if they are varieties and not F1 hybrids.
Turnip varieties, some of which we will talk about at the end of this article, fall into two main categories – these are table varieties and forage varieties, or Turnip. naturally, this article will focus on edible Turnip.
Interesting facts! Not everyone may know that Turnip is a close relative of cabbage and kohlrabi as well as well-known crops such as Brussels and red cabbage, cauliflower, broccoli, and Peking. In addition, Turnip and White Turnip, which are still widely cultivated, can also be considered as relatives of Turnip.
HOW TO GROW SPROUTED AND SEEDLESS TURNIP

How to grow Turnip on a plot – seedling first or direct sowing in the ground? Let’s talk about the seedling method first, as it gives you an early harvest of Turnip.
TURNIP PLANTING
Seed preparation and sowing
Typically, seeds for Turnip seedlings are sown in wooden boxes or individual cups about 30-50 days before they are permanently planted in the soil. Before sowing the seeds for seedling production, separate from them those seeds that will definitely not flower, and for this purpose simply soak all the Turnip seeds you have for sowing in a 5% salt solution.
To prepare such a solution, you should take 5 grams of common salt and dilute it in 100 grams of water heated to room temperature. Accordingly, if you have a lot of seeds, then the amount of water should be increased in proportion to the amount of salt.
After dipping the Turnip seeds into the salt solution, they must be thoroughly mixed and then left to stand for half an hour, during which time usually all the good seeds will settle and the bad ones will float – you can safely throw them away.
Once the Turnip seeds have been extracted from the salt solution, rinse them under running water and dry them on a dry cloth, then preferably purify the seeds. To do this, place the seeds in any paper towel bag and submerge them in water heated to 122°F (50°C) for 15 minutes, then simply move them into cold water for a few minutes.
That’s it, all that’s left is to place the Turnip seeds on a damp cloth, let them swell up and they’re ready to be sown.
Speaking of sowing: the ideal choice is peat chips. Before sowing the seeds, don’t forget to soak the tablets so that the soil in them swells up, and then put a few seeds in each tablet. You can then place the pellets with the seeds on a windowsill and cover them with aluminum foil until they germinate. There should be enough light, but no direct sunlight should reach the fragile Turnip seedlings. Once new shoots appear, the foil should be removed.
Cultivation of Turnip buds
Once the buds have emerged, they need to be provided with the right conditions for growth and development. For example, the ideal temperature for Turnip growth is 42-53°F (6-12°C), so it is perfectly possible to mark them on a balcony or terrace.
As soon as the Turnip seedlings are unfolded, one of the best-developed seedlings should be left in each plate, and the rest can be gently cut off at the very base with scissors.
Next, it is important to monitor the moisture content of the soil in the peat pellets to prevent her from overwatering, but also not to allow drying out. 4-5 days after the disclosure of the seed plants can be fed with nitroglycerin, dissolved in a bucket of water, and make a solution of 10-15 grams under each plant.
About half a month before planting in the ground, Turnip buds should begin to adapt to harsher conditions. This is achieved by hardening, which consists of placing the seedlings in an open space in the vegetable garden, first for an hour, then for half the light time, and then for a whole day. Thus, gradually, step by step by the end of 15 days, you can leave the seedlings outdoors all day.
Turnip germination
We do not start talking about peat pellets in vain, given that Turnip seedlings are poorly tolerant to picking, peat pellets will be timely and they can be planted in the soil with the seedlings without destroying the root ball, then the roots will be excluded and the seedlings quickly adapt to their new position.
Planting of Turnip seedlings in the middle zone is likely to be in mid-May, with a distance between plants equal to 10-14inch (25-35 cm).
Seedless cultivation of Turnip
We have already told you how to get and plant seedlings, but you can sow seeds directly in the ground, pre-selecting suitable seeds in a salt solution and letting them swell on a wet cloth.
Those who sow Turnip directly in the ground often face the problem of the correct time to sow Turnip, because it depends not only on the climatic characteristics of your area but also on the characteristics of the particular season.
As for the central part of the USA, here Turnip can be safely sown in open fields at the end of April, in more northern areas – at the beginning of May, and even in colder areas – at the beginning of June.
Important! The Turnip you sow between the end of June and mid-July can be both suitable for consumption and for storage during the winter. With this in mind, “experienced” gardeners sow their seeds in winter in order to harvest Turnip early (20 days before the due date).
It has been noted that Turnip seeds may start germinating as early as 40-50°F, and germination is fastest (actually within a few days) if the temperature is above 59°F (15°C).
WHERE TO SOW OR GROW TURNIP?
Turnip is a less demanding plant, but you will get the best results if you sow it in soil that is pH neutral and also fairly light clay. If the soil at your location is acidic, you should definitely lime it. Therefore, you need to apply 300 grams of lime per square meter under soil re-tillage when sowing in the fall and spring.
Important: Turnip grown in acidic soils cannot be stored.
Of course, before planting Turnip seedlings or sowing, it is necessary to prepare the soil by spreading a bucket of humus per square meter, 250-300 grams of wood ash, and a tablespoon of potassium sulfate on the surface and all digging the full bayonet of a shovel in an effort to remove all weeds from the soil, especially the rhizomes of couch grass.
As for the predecessors, Turnip will grow well where any bean crop, tomatoes, cucumbers, or potatoes were previously grown. Probably the worst for Turnip’s predecessors: watercress, amaranth, cabbage, and Turnip itself, as all these plants accumulate common pests and diseases underground, in addition to extracting the same nutrients from the soil.
HOW TO GROW TURNIP IN A VACANT LOT?
Planting seedlings as we described, seeds are usually sown in bands, making two rows of bands, leaving 10-12inch (25-30 cm) between the bands and between the seeds.
Of course, both planting seedlings and sowing Turnip seeds should be done in loose and moist soil, and at the time of sowing, or rather after sowing, the soil should be slightly compacted – this can be done with the back of a rake.
Turnip seeds should not be sown too deep, a few inches is the limit.
GROWING TURNIP IN WINTER
Since we mentioned the winter sowing of Turnip, we could not fail to describe it in detail. Thus, in the heart of the United States spend usually in October, but also in early November if the fall is very warm. The seeds usually survive the winter well under snow cover and germinate friendly and quickly in the spring.
Important note: When sowing in winter, Turnip seeds can be embedded 1.2inch (3cm) and covered with the same thick layer of moist nutrient soil.
After a snowfall, be sure to cover the seedbed with snow, which can be repeated 2-3 times.
CARE OF TURNIP IN FLOWERBEDS
Mulching and hoeing
After the sturdy sprouts have germinated, you can spread an even layer of wood ash over the entire bed to protect it from cruciferous fleas. If you want to grow other crops next to Turnip, there is no better choice than legumes.
After covering the bed with grass and wood ash and planting legumes, it is perfectly fine to mulch a second time, but this time it is best to use straw or hay. Such a mulch will save you time – and will save you from frequent loosening and eliminating soil sloughing, which turnips don’t like.
Don’t assume that mulch alone will solve the problem of loosening and weed control – do both, just less intensely.
If germination is too frequent, you can do thinning and repeat in 10-12 days if the plants still interfere with each other.
Watering Turnip
As many of you probably know, Turnip responds well to watering, so don’t wait for rain, but water heavily and regularly. If it has not rained for at least a week, then watering can be done and watered in the morning and evening to try to keep the soil slightly moist, but overwatering and turning the soil into a bog is not necessary.
Watering several times a week in the morning and in the evening, with a bucket of rain or settled water at room temperature for each square meter of bed is sufficient.
The critical periods when moisture is crucial are seedling emergence, true leaf formation, and the maximum growth period of the root crop. Watering should be kept to a minimum about a week before harvesting Turnip, and if it rains, even lightly, stop watering altogether because the rootstock will begin to crack.
Nutrition of Turnip
Normally, Turnip is fed only once or at most twice throughout the growing season. For the first application of nitrocellulose (one month after seedling emergence), it can be diluted at the rate of one matchbox per bucket of water, and this amount is used for each square meter of soil.
The second application of Turnip is around mid-summer when it is best to use potash. If the root crop is growing well, 250-300 grams of wood ash can be spread evenly over each square meter (it contains up to 5% potassium), or if the root growth is weak, 10 grams of potassium sulfate should be diluted in a bucket of water, and this amount should also be spent on each square meter of Turnip area.
PESTS AND DISEASES OF TURNIP
The story about Turnip cultivation would not be complete if we did not talk about the pests and diseases of this plant. As you know, they are common with cruciferous crops, which is why their neighbors with turnips are undesirable, as its predecessors, these plants are useless.
As for pests, Turnip is frequently attacked by cruciferous fleas, stink bugs, cabbage moths, chard moths, cabbage aphids, moths, white seeds (Turnip and cabbage), weevils, and spiny prickly insects.
Diseases affecting Turnip include Kira, foot-and-mouth disease, an avascular bacterial disease, mucilaginous bacterial disease, and gray rot and black stem disease.
PEST AND DISEASE PREVENTION
As you know, by strictly following the package directions before applying insecticides, miticides, and fungicides, you should try to avoid the appearance of pests or diseases. Seeds should be treated as described above, seedlings thinned to avoid their overgrowth and the stagnation of rain or irrigation water that can lead to outbreaks of rot, weeds removed – carriers of pests and diseases, all plant residues removed from the area, and plowed through the plot with the full bayonet of a spade immediately after harvesting Turnip, wrapping the ground layer but not breaking the soil for the winter.
If the number of diseased or pest-affected plants is small, they should be removed from the plot immediately, but if the number is large, it is necessary to use “Benomyl” and similar preparations.
Often, folk control measures, such as decoction of tomato or potato leaves, also help. The preparation is boiled on top for about 30 minutes, then filtered and diluted three times.
Before using the diluted solution, you need to add 40 grams of ordinary laundry soap to a bucket of the solution. Such a “preparation” will expel moths, squirrels, moths, various flies, and other pests, and if the pests are only in large numbers, then use a “persistent broad-spectrum insecticide” or a similar insecticide.
HARVESTING AND STORAGE OF TURNIP

For centuries in the United States, Turnip has been harvested around the end of September-early October because they knew: if harvesting is delayed, the root crops will become coarse and some of their flavors will be lost.
When digging root crops, you can use a pitchfork and choose a day with no rain or frost and plenty of sunshine.
Important: Never mutilate root crops used for storage to prevent them from being damaged.
Once the root crops have been removed from the soil, cut off the traction, leaving a few inches of leaf stalks, and remove any woody roots. Next, you should carefully clean the root crops out of the soil with a cloth, dry them in the sun (but only in the shade!) ), and sort the root crops according to their size.
Root crops can be stored directly on the plot for a week or so, covered with a layer of hay or straw 4-5inch (12-15 cm) thick, and then placed in a cellar or wine cellar, which needs to be kept at a temperature equal to 35-37°F (2-3°C) above zero or slightly lower.
Turnip stores well in boxes lined with dry sand or peat shavings, and it is important to make sure that the root crops do not touch each other and preferably are not pressed together particularly hard. This way, the roots can last for months without deteriorating.
If Turnip is rare, you can store them in a regular household refrigerator, just wrap them in polyethylene or food film. In the movie – Turnip on the balcony or in the refrigerator can last up to a month.
In the room, Turnip can last no more than a few weeks, which is a sign that Turnip has begun to spoil and its flesh will be more bitter.
For long-term storage, choose a Turnip with a diameter of more than 2inch (5cm).
That’s all we wanted to tell you about Turnip, if you have any questions or want to share your personal experience growing this vegetable then please share with us by leaving the comments.