In hobby gardening, grafting is an activity that once you start, you can’t stop. When the selection of grafted fruit trees is exhausted, attention turns to ornamental crops and shrubs (remember grapes). Then grafting starts to bear fruit and some varieties are disappointing – you have to regraft. Technically the simplest “behind the bark” grafting can become weak under strong crop loads – without proper “support” they sometimes break. Grafting must be repeated by mastering more reliable methods. Grafting in general is rapidly becoming a spring activity. The purpose of this activity, my observations and experiences, and the “split grafting” technique are discussed below. You will learn Spring Grafting – Why Can’t I Stop in the ThumbGarden article.
Why is Grafting Needed?
A good friend of mine, a biologist, from whom I learned a lot, started grafting purely because of a lack of space. The site is 15 acres (6 hectares) and a third of the space is taken up by the house with outbuildings and paved areas. That left 4 acres – “a penny” seems to be for a keen man. On these four acres, she manages to grow not only what she needs (herbs, vegetables, fruits, berries, grapes, and potatoes), but also a huge variety of what you want: an incredible variety of flowers – bulbs, perennials, and annuals. And roses.
The three trees on this land – apples, pears, and plums – were an experimental field: new varieties were grafted, flowered, and evaluated. Those that don’t meet their requirements are ruthlessly cut out and new ones are grafted in. In other words, saving space was the priority.
This also includes grafting several varieties onto plants that need pollinators: cherries, cherry blossoms, and buckthorn. By the way, even in self-propagating crops, cross-pollination increases their yield.
The second task – the rebirth of old trees – we achieved in the newly acquired orchard. Two trunks of a hollow, three-barrel apple tree were cut off, and bark from other varieties was grafted onto the stump. Since we like the apples on this tree, the third trunk is alive and bearing fruit, it has been slightly renewed and the red heart rejuvenation pruning can be done after the grafting has entered the fruiting stage (three apples, like now, have not yet borne fruit).
That old cherry tree, already half-turned to chaff, suffered a little damage to its roots and responded immediately with shoots from the roots. We chose the most convenient shoots, cut the roots from the main trunk, waited for normal rooting, and when the shoots reached pencil thickness, grafted a variety of cuttings. It already has color. The old cherry tree fell off last year.
The third task is grafting low winter-hardy crops. Of course, this does not mean that southern peaches can be grown in colder areas, but varieties from previous winter-tolerant zones are very realistic to grow. Especially if the rootstock is a local scion or an old local hardy variety.
The fourth is to increase the variety and lengthen the consumption time. In our orchard, this option came about a few days after the harvest of old apple and peach trees swamped us, we agonized over their recycling and disposal, and then it ended as quickly as it had begun. We don’t need to eat that much at once; we want to eat fruit from our own trees, even different ones, throughout the summer and fall.
The fifth task was to make it pretty! On the canopy of the pink-flowered peaches, the apricot branches looked white and foamy, while the grafted apricot branches looked pink on a white plum-colored background. Nectarines in peaches also come in different shades of color and the tree looks unusual.
In ornamental horticulture, grafting can also solve many problems: from improving winter hardiness to creating unusual shape and color combinations. Creating dwarf plants from shrubs is a classic.
What to Graft, Where, When, and with What?
The results of four years of experiments have shown that the best rootstock for most walnuts is the cherry plum. Apricots, peaches, plums, and other varieties of Prunus cerasifera, as well as hairy cherry trees, can grow well on them. It also supports Prunus triloba, which can be used as an ornamental tree.
Plums are also good as rootstocks for apricots, large Prunus cerasifera, plums, and Prunus triloba. Our two mature peach trees provided a broad site for experiments, and apricot, nectarine, Louisiana, and other peach varieties successfully took root there.
The cherries and cheerios were a bit more capricious, not all of the graft rooted, only half, but all rooted with the dukes. The cherry on the cherry has not been rooted yet, and the cherry on the carrion has not attempted to graft – we have one cherry and several carrions. The cherry on the cherry is rooting well, as is the cherry on the cherry.
I’d like to say a few words about the saplings. Apples and pears are a gift to novice grafters. All the grafting took root on them, only one was done with a dry plug (what if it took root? — it didn’t root). Grafting an apple tree to an apple tree and a pear to a pear. We will see this year when we graft apple trees to pear trees.
For hazelnut trees it was quite difficult: out of 7 grafts of hazelnut trees, one has rooted and is growing, cuttings of walnut trees did not root at all, and this year I will graft with rings, as suggested by a reader.
For all crops, it is best to follow the rule that the scion (the one being grafted) should not mature later than the scion. For example, early and medium-early varieties will flower and fruit successfully on an early apple tree, but a late-maturing variety will stagnate the tree: it is already preparing for winter, and here there is some fruit. The grafted part will simply not have time to prepare for winter and may freeze. And it will reduce the overall winter hardiness of the tree.
Another important rule is that the rootstock must be awake and the plugs must still be dormant, otherwise, the plugs will use up all their reserves and die without getting anything from the still dormant rootstock. When cutting plugs from one tree and grafting to another, the plugs are cut from the north side, the “sleepiest” side, and grafted to the south side.
The best place for grafting is on the central or upper branches of the tree; the tree draws first there and has a higher grafting rate. On cherry trees, cuttings are rooted only on the upper branches.
In our garden, all grafting is done mainly in spring by cuttings. The timing of grafting is suggested by the plants themselves. The grafting season begins with the “green cone” stage when the green tips appear on the leaf buds. Grafting can be carried out until the shoots have finished growing.
What is Needed for Grafting?
After several seasons, the necessary and sufficient tools for grafting have been identified, and almost all of them are available for most gardeners.
Garden saw and pruning shears. The former – is used to cut thick branches for grafting “behind the bark”; the latter is used to cut branches for grafting “at the fork” and to cut cuttings into pieces. Keep your tools sharp! Cuttings made with well-sharpened tools are smooth, have no bark scratches, and heal well afterward.
A grafting knife. It has a bone on it that is used to separate the bark – a really handy thing to have. I use the blade itself to split the branches of the rootstock, and I find it inconvenient to use this knife to make cuts on cuttings.
A large stationery knife with replaceable blades. This is a great tool for making smooth, even cuts on cuttings, and for cutting bark. No need to get distracted by sharpening the blade – break off the blunt end and get back to work. If the blade breaks all the way through, it won’t take long to replace it. You can even break the blade without sterilizing it.
A jar of water, or better yet, a weak solution of honey (half a teaspoon per cup). If something goes wrong during the grafting process, put the cuttings in this jar. The cuttings will oxidize in the air for half a minute and then they will be badly rooted. Therefore, if the graft has been cut, the 30 seconds are up, and there is a call or other emergency, the cuttings should be placed in the jar and wait there.
Horticultural wax will be used to seal the grafting area to keep the bare cuttings from oxidizing in the air.
Barrier tape or food film. I had used tape fairly successfully in previous years, but this year it was a bit stiff and tore easily. I had to improvise something. Food tape turned out to be a good substitute – it has good stretch and self-adhesive properties. So there are a few options.
Labels, lanyards, and markers. Identification should not be overlooked. You’ll forget what you’ve grafted within a month and next year you won’t remember it at all. The most annoying thing is that one of the two grafts does not take root and you want to graft again next season, but it is impossible to remember the species of live and non-live grafts. This is a shame! The marking needs to be indelible and the twine needs to last about three years.
Newspapers and breakfast bags. This is to protect the grafted plugs from drying out in the wind and sun and from overheating the first time.
Of course, grafting requires a tree or scion (rootstock) and a cutting (scion). Again, the cuttings should be in a dormant state and the tree should be awake.
We have ordered cuttings for four years and they are delivered to us at the beginning of the grafting season. The cost of the cuttings is quite affordable.
Grafting with Split Cuttings
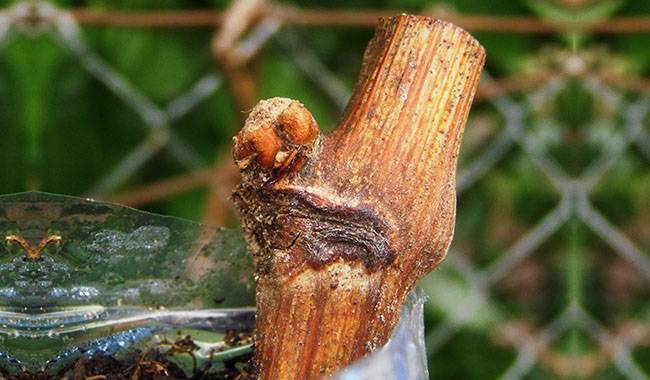
The first grafting method I mastered was “behind the bark”. Indeed, a kind of grafting without problems is quite successful for beginners. After several years of observation, this option proved to have some drawbacks.
- These graftings break easily; not only in the first season but sometimes later, when the crop is heavy; the grafted branch needs to be attached to the trunk or to an adjacent branch
- The grafting site itself grows an unsightly overgrowth, and since it is unsightly in our humid conditions, it immediately grows a lichen.
The obvious advantage is the simplicity of the method and the ability to graft four plugs at a time onto the bark of thickly sawn branches or trunks.
It proved to be more convenient to graft shoots and young shoots that grew after the old branches were cut off. Another difficulty with this method, compared to grafting with bark, is that after cutting, the branch must be split accurately with pruning shears about 1 inch (2.5 cm) without breaking. On the scion, instead of cutting from one side, cut from both sides; this is neater and more robust for adherence.
The diameters of the rootstock and scion do not have to match exactly. The diameter of the scion can be smaller, as long as the bark and bark layers at one end are as closely aligned as possible. If the rootstock is thick, two plugs can also be placed in the slit (remember to combine them) – they will also root well.
The technique of grafting is not complicated.
- Prepare everything you need for grafting.
- 24 hours before grafting the plugs should be renewed and placed in water.
- Choose a quiet, cloudy day without a trace of rain.
- Sit comfortably next to the tree chosen for the rootstock and arrange and set up everything you need on a bench.
- Find a branch of a suitable thickness (no thicker than your finger) on the tree, preferably extending from the middle or upper trunk of the canopy, and cut it with pruning shears at about 2 inches (5 cm) from the trunk.
- Using a sharp knife, make an incision in the diameter of the prepared stump to a depth of about 1 inch (2.5 cm); I make it parallel to the ground so that it is more secure.
- If the scion cuttings are long-the standard cuttings are 15 inches (38 cm) long-they should be cut with pruning shears so that 4-5 buds remain on each section; the cut should be 0.2 inches (0.5 cm) above the buds.
- We keep one cutting for our work and put the others in the water.
- Cut the bottom of the selected cuttings into wedges about 1 inch (2.5 cm) long, so that the buds lie above the bark strip left behind; do not touch the cuttings with your hands; it does not matter if one bud is damaged during the operation: 3-4 buds on the cuttings are enough.
- Insert the grafting knife into the slit to increase the gap and push the plugin, uniting the neck of the plug with the neck of the rootstock; the neck is the green layer of actively dividing cells directly under the bark, which can be clearly seen on the plug.
- Repeat the operation if there is still room in the fissure for a second cutting.
- Cover all open cuttings – the upper end of the cuttings and the grafting area – with garden varnish to prevent oxidation.
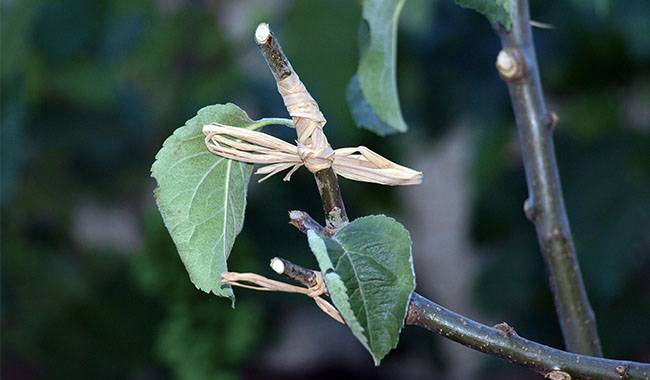
- Wrap tape or cling film around the cleavage area, keeping it as tight as possible, but not too tight.
- We wrap a layer of newspaper along with the cleavage area around the cuttings, place a breakfast bag on top, and secure this all with a label.
On the label write the cultivar, the species of the tree (for example, if grafting an apricot plug to a plum tree), and the date of grafting. This date will then be used as a guide for the following operations.
The graft can be left for a few weeks after grafting. After the half, a month, remove the bags and newspapers, admire the awakened buds and cover the grafts with a thin non-woven material, as they should not yet be exposed to open sunlight or ventilation. Let them sit in the wool bag for another week or a week and a half until a calm, cloudy day arrives. Then remove the wool, keeping the tape or cling wrap wrapping and also the label.
That’s it. You can brag about it to your friends and acquaintances.


