Calibrachoa (Million Bells)or zauberglockchen probably is the most popular plant for gardens and balconies. It has been popular with professional and amateur gardeners alike for decades, and in 1921 an asteroid discovered by astronomers was even named after it. Isn’t that an endorsement?
How to grow Calibrachoa? Man’s love for Calibrachoa has stimulated breeders to create more and more varieties and hybrids of this delicate, fragrant and fascinating plant.
Some varieties that have appeared in recent times have become less similar to their ancestors, but the cultivation rules and care conditions for different varieties of Calibrachoa do not differ much.
- How to plant Calibrachoa seedlings correctly?
- When can I transplant them into the flower bed?
- How to care for the plant so that its decorative qualities remain at the highest level?
All these questions and more will be found the answer in the article.
CALIBRACHOA PLANTING AND CARE
Sowing: Seeds are sown for seedlings in late February or March and planted in the ground in late May.
Flowering: Calibrachoa will be in the ground after flowering. Flowering can last until frost.
Lighting: Choose bright sunlight.
Soil: Fertile loam or sandy loam soil fertilized with compost or humus.
Watering: Water at the roots during dry periods.
Fertilization: Start fertilizing one week after planting, at 10-day intervals. stop fertilizing in August.
Propagation: Propagate by seeds and cuttings.
Pests: Aphids, spider mites, thrips, and slugs.
Diseases: Phytophthora, leaf blight, gray rot, and blackleg.
Calibrachoa or nightshades is a genus of herbaceous perennials and semi-shrubs of the Solanaceae family, which grows in the tropical regions of Brazil, Argentina, Bolivia, Uruguay, and Paraguay by nature.
The name of the plant comes from the Brazilian word “petun”, meaning “tobacco”, of which Calibrachoa is a relative. One of these species is even found in North America.
There are about twenty-five species of Calibrachoa, sometimes very different from each other. calibrachoa has been cultivated since the eighteenth century.
The hybrids obtained by breeders more than a century ago are grown as balcony or garden annuals. The large, brightly colored Calibrachoa attracts florists, and they decorate the garden or balcony with fierce flowers throughout the season.
In addition, Calibrachoa matches surprisingly well with other garden flowers – anemones and begonias. Very beautiful is the suspension in different colors of varieties consisting of ampelnaCalibrachoa.
And the main reason for the popularity of this flower is the fact that it is not very difficult to plant and grow.
BOTANICAL DESCRIPTION
Calibrachoa is shrubby, stemmed or erect, thickly branched, 6-27inch (15-70 cm) tall, elliptical, solid Calibrachoa leaves 2-5inch (5-12 cm) long, alternately arranged, green or dark green.
Stems and leaves are pubescent. Flowers are funnel-shaped, solitary, on short peduncles, axillary or terminal, erect or irregular, solitary or fimbriate, sometimes fringed.
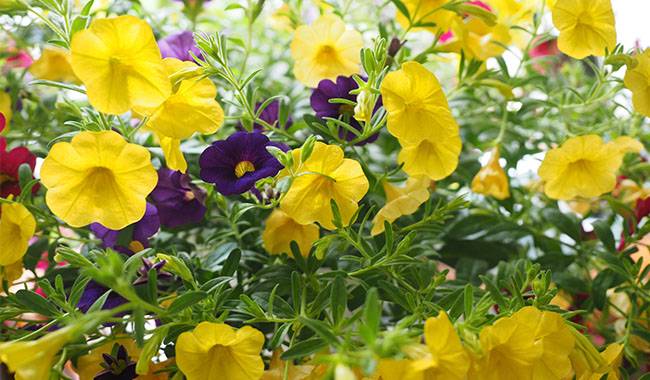
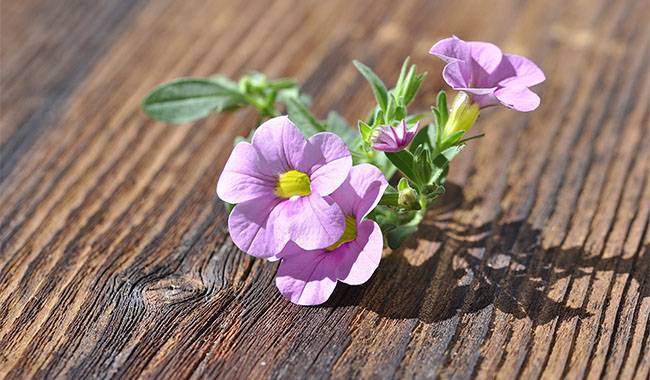
Flower color: reddish, purple, white, pink, purple, and blue, with a halo, border, dark veined or white stellate.
The fruit is a bivalve capsule with small seeds. The garden variety Calibrachoa or hybrid Calibrachoa, bred from the wild variety Calibrachoa purple and Calibrachoa axillary flowers, is planted in gardens and on balconies. Garden Calibrachoa blooms from July until frost. calibrachoa perennials are cultivated exclusively as annuals.
GROWING CALIBRACHOA FROM SEED
Sowing seeds
Beginners often ask how to grow Calibrachoa from seed. if you have the opportunity to light seedlings, you can sow Calibrachoa seeds for seedlings in February. However, seeds are usually sown in late March and should be prepared in large areas, because the germination rate of seeds is low due to the lack of long enough daylight hours.
The soil for sowing should be loose, light, and nutrient-rich: 2 parts of leaf or sod soil, 2 parts of humus, 1 part of sand, and 2 parts of peat. The top layer of soil about 0.4inch (1cm) thick should be sieved so that the seeds lie evenly on its surface, and the prepared soil should be watered sufficiently the day before sowing.
The seeds should be mixed with dry sand and placed on the ground, leveled, scattered, covered with glass or plastic film, and left to germinate at 68-73°F (20-23°C). Germination will occur in about a week and will require daily spraying and drying twice a day.
The main task during this period is to ensure high air humidity in the greenhouse, but also to avoid blackleg disease due to moisture, so the glass should be turned over and the film wiped as soon as condensation appears on the glass or film each day.
In addition, sprinkle the seedlings with water from time to time, but with a light solution of manganese. After the first leaves appear on the seedlings, the glass can be removed and the soil slightly covered with sand to reduce watering.
SEEDLING CULTIVATION
When the seedlings have 3-4 true leaves, curing is done and the soil in the container is pre-moisturized. Carefully pick up the seedlings with a stick and remove a leaf from the soil, trying not to shake the soil off the roots, then dive into a peat or plastic pot and add the same soil mixture. Water the spread plants and cover them with paper or luthier for two to three days.
Calibrachoa needs careful care at this stage of growth, and the most responsible moment is to keep the soil in a constant state of moderate moisture.
The frequency of watering during this period depends on many factors, so you have to decide whether to moisten the soil 2-3 times a day or only 1-2 times a week. Don’t forget to loosen the soil around the seedlings.
Start feeding the seedlings a week after the weekly picking, alternating between foliar and root feeding. For this purpose, use a compound water-soluble fertilizer of about 25-35 grams per 10 liters of water.
Multi-flowered varieties bloom two and a half months after sowing, large-flowered varieties – three months. Before planting in the open ground, it is better to put the already grown seedlings in a cool room or take them to a place with fresh air during the day to acclimatize for a while.

GROWING CALIBRACHOA
When to plant
Calibrachoa prefers to grow in sandy loam or loamy fertile soil. fortunately, compost or humus should be introduced to the soil before planting, but no fertilizer should be applied, as fertilizer promotes fungal diseases.
The site should be open and in full sun. Calibrachoa is planted after all the spring frosts have passed (around late May), preferably on a cloudy day or in the evening.
HOW TO PLANT CALIBRACHOA
If you plant Calibrachoa that is already in bloom, it will flower until late November. In general, Calibrachoa is planted at the edge of the bed because of their low growth rate.
The seedlings are well watered in pots before planting and then planted together with a soil ball, observing a distance of 12-16inch (30-40 cm) between the shrubs. after Calibrachoa is planted, it is watered and mulched on site the next day.
CARE OF CALIBRACHOA
Planting conditions
Planting Calibrachoa does not require too much effort on your part, but to achieve the best results you need to start by learning the theory of Calibrachoa care.
Although adult Calibrachoa is a drought-tolerant plant, it does require watering during the hot summer months, and the larger-flowered varieties are more demanding than the smaller ones in this matter.
Large-flowered varieties need to be watered under the roots so as not to damage the delicate flowers. calibrachoa plots should be weeded and loosened the day after watering so that the ground does not become crusty. However, the beauty and flowering of Calibrachoa depend most importantly on regular fertilization.
Fertilization of Calibrachoa seedlings begins a week after they are in the ground, and this is continued every ten days with a potassium-based compound fertilizer until August. Sometimes organic fertilizers such as butter infusion or humus improver can also be used.
PROPAGATION BY CUTTINGS
Dwarf Calibrachoa and Marjoram and all small Calibrachoa are propagated in this way. Magnificent Calibrachoa can be cut in late winter or early spring, while Calibrachoa calibrachoa and Calibrachoa arvensis can be cut at any time of the year as long as they are in daylight and indoor temperatures are 70-75°F (21-24°C).
Take top cuttings of 4-6 leaves with coarse petunias, but leave only two upper leaves on the cuttings and they are shortened by half. Plant the cuttings with the same mixture as seed petunias, but top with a layer of sand or perlite 0.8-1inch (2-2.5 cm) and sprinkle with a fungicide solution. Keep the cuttings 0.6-0.8inch (1.5-2 cm) apart and cover the container with glass.
No growth stimulants (e.g., hyphomycin) are needed, mainly the cuttings should be cut because their rooting ability decreases with time.
Make sure that the soil in the greenhouse is constantly moist, spray the cuttings twice a day with a sprayer, but do not breed moisture in the container: mold or black legs can appear. In about a week’s time, Calibrachoa roots.
When the roots of seedlings are 0.4-0.6inch (1-1.5 cm) long, plant them into pots 2inch (5 cm) in diameter. Stem seedlings strengthen the clump of 4-5 leaves or more and prune by cutting off the shoot tips – perfect for rooting cuttings. If necessary, prune the Calibrachoa shoots again after two weeks.
After a month and a half, plant the plants into pots 4-5inch (11-13 cm) in diameter. Calibrachoa cuttings are cared for in much the same way as seedlings, but Calibrachoa and Petunia require more space, so the pots with them are usually hung up.
PESTS AND DISEASES
I’ll say it again: you won’t be afraid of pests and diseases as long as you follow the advice to cultivate your plants. But we don’t live in an ideal world, so from time to time, you will hear complaints about Calibrachoa drying out or yellowing.
If the rules of care are not followed, Calibrachoa may suffer from phylloxera, leaf blight, blackleg, and gray rot, which can be controlled with special preparations and, more importantly, more easily, by following the rules of plant care, you can avoid these troubles.
If the rules are not followed, in addition to fungal diseases, Calibrachoa can contract viral diseases for which there is no treatment.
Among the pests, spider mites, aphids, slugs, and thrips can cause damage.
HOW TO COLLECT SEEDS
If you decide to collect Calibrachoa seeds, wait until the seeds are mature on the shrubs. At the beginning of the flowering season, plan a few minimum buds for Calibrachoa to be planted next year, as the seed germination and maturation process are faster there.
It takes about two months from bud formation to full seed maturity.
The seeds of Calibrachoa are very small, about 0.5 mm in diameter, and a pod contains about a hundred of them.
You can cut open the seedboxes and store them at home, but it is best to remove the seeds from the boxes, put them in bags, and label each bag with the name of the variety and the year of harvest.
Seeds should be allowed to stand at room temperature for three to four months. calibrachoa seeds have been stored properly for up to four years without losing their germination rate.
CALIBRACHOA AFTER FLOWERING
If you really want to keep a particularly attractive flowering petunia at home, dig it up in October, trim the stems, plant it in a pot and rest it in a cool room where you will keep the soil moderately moist and water it occasionally.
In February, move ‘Sleeping Beauty’ to a bright, warm windowsill and resume regular watering. When the young shoots will have 2-3 pairs of leaves, cut them off with a “heel”, plant them in a vase with fertile soil, pour a layer of sand on top, cover the vase with film or glass, and keep them in a cool place out of the light, watering, ventilating, and spraying as needed for 3 weeks until the young shoots grow roots.
The seedlings are then planted in the cups and nurtured until it is time to emerge.
If you don’t want to go to all that trouble and expect to buy and sow new seeds in the spring, treat Calibrachoa like an annual: remove the remains of the shrub from the ground and re-cultivate it.
CALIBRACHOA VARIETIES
Calibrachoa hybrids are divided into two categories: multiflora Calibrachoa and large-flowered Calibrachoa.
They start flowering earlier than the large-flowered ones, forming a large number of flowers up to 2inch (5cm) in diameter on their bushes, which bloom for a very long time. They are not capricious, grow in any soil, are not afraid of rain, love sunlight, and are true garden flowers.
They may not have the splendor of the larger flowers, but the compact clusters, solidly covered with various shades of flowers, will delight flower lovers until the autumn chill. A popular variety of multi-flowered Calibrachoa.