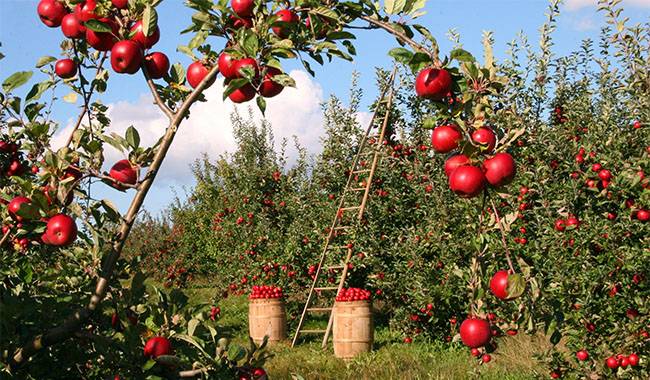
In the current season, there is no record harvest of apples: the rainy and rather cool summer, which looked like a mixture of autumn and spring, prevented it. But still there is a harvest, it is tangible, and if we do not want the harvested apples to deteriorate in a couple of weeks, they must be properly preserved.
Gardeners say that with proper storage, an apple can lie for several years, retaining its varietal qualities and properties, but why should we wait so long to taste it ?
VARIETY DETERMINES SUCCESS OR FAILURE
We start by choosing a variety. We don’t have any long and annoying variety descriptions, but we’ll tell you as briefly as possible which varieties will keep longer and which ones will either become flabby and squashed or end up rotting after a week of storage no matter how hard you try.
To someone, if we say that all varieties of apples are divided into categories based on storability, then we might be able to open up a mystery. Therefore, when choosing apple seedlings, you have to find out which tolerance category the fruit belongs to (of course, if you want the fruit to last as long as possible).
As a rule, the highest tolerance is observed in the late, so-called winter-ripening varieties, in which the harvest starts almost last (in the middle of the American zone – this is mid-October). It is not necessary to describe the varieties of apples, just look at the National Register and find winter varieties in the list.
WHEN TO HARVEST APPLES?
However, it is very important that not only the right choice of variety depends on the storage time of apples, but also on how you harvest them and how you treat the fruit itself. If you have a fruit picker, it must be clean, with smooth and flat edges, and you must be able to use it. In other respects, the storage containers (wooden boxes, baskets, etc.) should also be clean.
By the way, you know that you can only collect apples in plastic buckets, preferably made of soft plastic, with a capacity of no more than 22 lb (10 kg), and using rubber gloves for collection. In addition, it is important to know if the apples are ready to be picked and, secondly if they are too unripe. On the other hand, if they are overripe, they cannot be stored.
Find out the ripeness of the apples
Let’s start by finding out how ripe the apples are. Usually, this is easy. You go to an apple tree and see that it has dropped an apple or two. Sure, it could be an easy case of getting rid of fruit moths, but if the apples are clean and don’t show any signs of damage, then it’s probably time to harvest.
If you don’t trust the apple tree, you can measure its ripeness yourself; there are some basic techniques you can use, such as ripping it open and pressing it with your fingertips. You will get a dent, and if it disappears right away, it is too early to harvest.
However, if the skin has cracked, the apple is overripe and it is time to harvest, otherwise storing the fruit is impossible. If the peel has sagged and flattened only slightly, it’s time to harvest the apples, they’re probably ripe.
Of course, you can also look for color and weight, aroma and characteristic ripeness, and length of the ripening period. If you don’t believe in either of these methods, you can always rely on science.
The scientific method of determining apple ripeness
In fact, not many people are really aware of this method, but it does exist. To determine if the fruit is ripe, you must take 0.26 gal (1 liter) of distilled water and dissolve three grams of potassium iodide and one gram of iodine in it. Then take an apple, cut it lengthwise and submerge it in the solution.
The color of the edges and the center of the apple will show whether it is ripe or not: if the color of these areas is blue, this means that the starch content is too high and the picking is too early, but if it is blue and the center part of the apple is yellow, it is too ripe and the picking should start. If the center and sides are yellow, the apples are overripe and cannot be used fresh or processed.
Gardeners with years of experience in the field try to harvest slightly less ripe crops if they will be used for storage rather than sold immediately after harvest.
HARVESTING THE APPLE

So, let’s start harvesting apples. Equip a soft plastic bucket, put on rubber gloves, take a ladder and a wheelbarrow with boxes – and go to the garden. The main thing is that by the time you start picking, the fruit should be completely dry: even if it rained yesterday and was dry by noon, it is perfectly ready for picking, but not in rain, drizzle, frost, etc.
The fruit should be picked very carefully so as not to cause any injury. As a rule, hold the fruit in one hand, wearing rubber gloves, and rotate it slightly counterclockwise until it comes off the branch with its stalk, then the fruit should not be thrown away and put into a bucket.
Important! The keys to proper storage of apples: correctly defined removal time, dry fruit, rubber gloves, undamaged, with stems.
The apple stem is the key to success, first of all: if it falls off for some reason, then most likely the fruit will not lie for a long time. After collecting the fruit from the bucket into the container (or just into the box), you need to pour the fruits not “like potatoes” but by moving them around, and if they do fall, replace your hand in order to soften the blow as much as possible.
Do not under any circumstances wipe off the “matt film” of the fruit, the wax film that covers it, which is at the same time additional protection for the fruit and extends its shelf life.
Mechanical harvesting
Mechanical harvesting of apples is now also common practice. The arrangement is very simple – a large tractor hooks the tree and shakes it, and the apples fall onto a cloth and are collected. The fruit is rarely put into storage and is usually used for processing or a quick sale.
Harvesting apples with a fruit picker
Fruit pickers are used in order to avoid promoting infection and to prevent the fruit from rotting at the top of the tree where ladders cannot reach. They are like a human hand on a stick that can easily pick up an apple and tear it off. After such picking, there is often damage on top (apples, of course), and if there is no damage, then the fruit can be sent to storage.
APPLE SORTING
In Germany, pickers wear a sort of talisman around their necks – a ring on a thick wire through which an apple is processed if it passes. Sometimes they even omit the gloves, so everything is decided by eye. As a rule, apples with a diameter of at least 1.5-2inch (4-5 cm) are put into storage.
It is best to cool the apples immediately after collecting them – that is, the entire batch you have – and move them into a room where the temperature is at least 59°F (15°C) below street level and leave them that way for a few weeks. You can then re-sort the apples, as during this period, in addition to the inconsistencies in size, there may be more significant negative signs of fruit, which may well lead to unfortunate consequences later.
Experienced growers in this case put away in a separate container or box the fruits without stalks, with slight dents, scrapes, insect holes, etc., and choose only the desirable ones and put them in another box or container.
Important! As you know, apples release ethylene during storage, which simply means that they are allowed to age or breathe, for who knows better. Therefore, different varieties will release different amounts of ethylene, so it is recommended to store different cultivars in different crates or other containers.
If you have time, you can at least divide the apples by eye into small, medium, and large categories and then use them for various purposes, taking into account the size of the fruit.
Only then can you say that the harvested fruit is really ready for storage.
Apples are usually stored in the cellar, basement, cellar basement, pantry, under the kitchen table, or on the balcony. The meaning is the same: it is a wooden or cardboard box, only the conditions are different – temperature and humidity are different.
Ideally, bearing in mind that apples release ethylene, which can spoil other vegetables, such as de-flavored carrots, it is best to store them separately from other products, because apples, then apples, period.
If you give space to apples in the basement, ethylene accumulates indoors and then makes potatoes and beets, and even celery grows, so cohabitation is ruled out.
STORING APPLES
Of course, before storing apples, the room must be disinfected. The first thing to do is to remove all garbage, rotting shelves, etc. Next, you should seal all cracks with a mixture of broken glass (preferably bottled glass) and plaster or cement, and after that, without any obstacles, disinfect it. Of course, we are not talking here about storage rooms or balconies, but basements, cellars, or wine cellars. We recommend treating the walls of these storage areas with a fresh solution of slaked lime and copper sulfate.
Its composition is simple: a bucket of water requires 120-130 grams of copper sulfate and 3.3lb (1.5 kg) of lime. Regarding the floor, it is best to treat it with an iron sulfate solution (one bucket of water is enough to restrain 400 grams). Looking ahead, I would say that if there is condensation, you can sprinkle lime on the floor, it absorbs the water well.
STORAGE CONDITIONS FOR APPLES

Do not be too flattered to think that your ideally picked apples, being nothing to handle, will last until a new harvest. Even under ideal home conditions, 4 or 7 months would be a personal record you could really boast about.
However, in order for apples to last even a few weeks, the room in which they are stored needs to create the right conditions for them so that ethylene production is minimal and the apples do not “breathe” as intensively or age as quickly. Therefore, the temperature in the basement or cellar should be kept at a maximum of 32-39 °F (0-4 °C), while the humidity – at the level of 80-90%, preferably without sharp fluctuations.
PACKAGING FOR STORING APPLES
Storing apples at home, in fact, you can do anything, yes, at least in baskets, but usually for this purpose use wooden boxes or cardboard boxes. The best variants are wooden crates, nailed with small nails on slats, about 0.4inch (1cm) thick. They are strong, reliable, of normal weight (i.e. not very heavy even with a load), and easily scraped clean with a knife or simply treated with a 3% manganese solution for the next season.
WAYS TO STORE APPLES
This is a matter of course. Of course, in big stores, apples are stored in special containers that can hold several tons of apples and then transferred to a storage room with the right atmosphere. At home, it’s a different story.
Primary Stacking
Apples (again, wearing rubber gloves) were picked and stacked in one to three layers, stalk side up, without being covered with any kind of material. They are stacked in wooden crates or cardboard boxes, but this is not a very reliable method because the quality of the apples is very difficult to check: if an apple suddenly starts to rot on the lowest “floor”, it will be very difficult to reach and throw it away because otherwise the rot will spread quickly to the other apples and ruin a large part of your harvest.
Wrap in paper
It is important to know what paper to use. Never use magazines or newspapers, as they have hard edges and can damage the skin of the apples. It is best to use regular napkins or plain toilet paper, which is the softest way to wrap apples. When wrapping an apple, try to make it (the apple) as dry as possible, wrap it completely in the paper, put it in a pre-prepared container, and have it in a storage place with the stalk facing up, but not down, as many people do this by mistake for some reason. In this form, they can be stored for as long as possible, as long as you do not neglect the diseased apples.
Re-stratify
This is a very good way to store apples and is very common. You can use ordinary dry river sand as the layer you want to cover the apples with, but it is better to add wood, furnace ash, or soot (one-tenth of the sand). The sand and ashes (soot, etc.) should be poured strictly on the bottom of the container (crate, box), pour a layer of 1-1.5inch (3-4 cm), and put the fruit apples together so that they do not touch each other in the bucket. Next, you need to pour another layer (of the same composition) to completely cover the apples, put them on top of it, and so on until the top of the container. Usually fits three or four “floors”, depending on the size of the apples or the container.
If you have neither river sand nor sooty ash, you can use sawdust (the most common, by the way), fallen leaves (if it is dry and disease-free), wood chips (any wood chips except coniferous trees), onion hulls (but if the harvest is large, it will need a lot), sunflower or buckwheat hulls, and peat (dried) or even moss (to act as an absorbent).
Storage in the ground
If there is no cellar, no wine cellar, no balcony, the storage room in the apartment is occupied by skis, you can store apples directly on the base of the house, literally burying them in the ground. Trenches, holes, voids (who have any size crop) are advised to prepare a week before the collection of apples. The standard size remains a trench 21-26inch (55-65 cm) deep and 14-18inch (35-45 cm) wide. At the bottom, it is necessary to throw on or spruce paws, or juniper shoots (it is said that it can be saved from rodents, in fact, can be saved, but not necessarily).
Next, the apples themselves are placed in plastic bags (new, previously unused). Try to put 8.8-11lb (4-5kg) of apples in one bag, and not more than that. Then place these bags (tied, but with small slits for ethylene to escape, usually a dozen pricks with a needle are enough) in a trench and when it is filled, cover it with soil.
This should be done on a dry and sunny day when the soil is well crumbled so that no air voids form when covering your “cave” with food. It is recommended to cover it all with a layer of crop-covering nonwoven fabric – it will prevent cooling and moisture. Poles can be inserted on all four sides as a suggestive sign of something of great value buried.
In summary, a few of the cutting-edge techniques suggested by Big Farm are to expose apples to CO2 and UV light.
What’s the point of this? First, the apples (also carefully picked, selected, etc.) are placed in large polyethylene bags and then placed in the basement where a siphon tube can be used to make mediocre soda and pump small doses of CO2 into the bags. The opening is sealed tightly. Apples can be kept in such bags for a long time if the seal is not broken and no diseased fruit appears.
Other farmers go a step further. They manage to treat the layers of apples with UV lamps that have germicidal properties. Usually, half an hour is enough to kill all bacteria on the surface of the fruit. If the scale is large, then the apples are laid in layers on the floor of a large room, such lights are hung at a distance of 60inch (1.5 meters) and turned on for the time specified above, then the layer of apples is replaced with a new one, and so on. It is believed that the problem of decay during storage in this manner would be completely eliminated.
In general, apples can and should be stored. We have described many ways to do this, so if you have the opportunity to grow late varieties of apples on your own plot, then try to learn how to store them properly.